How To Make Hypertufa Garden Spheres

This is the first in a series of How To posts inspired by good friend and fellow Tennessee blogger, Gail of Clay and Limestone. She suggested a post be written on how to make the concrete balls that were shown in a recent post about the concrete projects that have been done over the years at the Fairegarden. Click here to read about Fun With Concrete. Glad to oblige, Gail. Hope there is some interest out in the blogdom for such a series. If not, this will be the first and last how to. And thanks for the lavender marker, my friend, it looks good next to the lavender plant, a bit of rock from Brokenbeat's place and that old concrete ball.



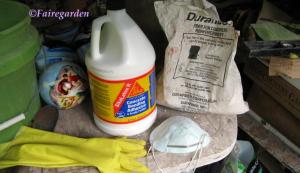
First gather up your ingredients. No, check that. First, figure out a good place to do this project. It helps if you can stand up fairly straight, to save your back. I have an old plastic patio table under the garage deck that is the home to all projects involving concrete products among other hobbies. Click here to read about this space. Underneath the deck floor is lined with the extra metal from the roofing to make it a waterproof space, out of the hot sun. It is a mess, but very useful. Okay, onward. Gather your supplies. For this project, a bag of perlite and a bag of spaghnum peat moss, found at a big box home improvement store in the house plant section will be needed. A bag of Portland cement, only available in ninety-four pound bags unfortunately, is kept in a wheelbarrow in the garage. This must not get wet or it will harden rock solid. You should have a mask, for the cement is like dust and flies all over the place, especially up your nose and into your lungs. No to that. You need some latex type gloves. The Financier bought these instead of the clear package of ten that was on the shopping list, and I like them much better for they are longer and stay up better while working with the wet stuff. A bottle of concrete bonding agent is always used here to add strength to the projects, same with the fibermesh. The cement and bonding agent can be found at the same big box store. The fibermesh was found at a concrete establishment that used to be near my house. I asked if they would sell me a small quantity and they gave me the bag. Everything should be assembled ahead of time because once you begin, you need to go start to finish before the mix starts to harden.

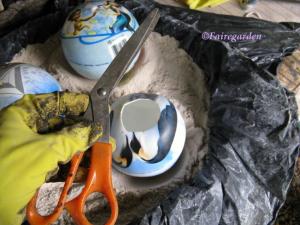
You will need some sand in a container to allow for the rubber children's play balls to maintain the round shape and hold them still. I use a large round metal feed dish from Tractor Supply. I actually use many feed type things from that store for garden uses like seed starting and mixing potting soils. They are cheap, store easily and are made from metal and rubber. I line the dish with plastic to be able to move the sand around from project to project and cover it to keep it clean between uses. Since the finished balls will need to be covered with plastic while they cure, it is easy to fold up the edges over the tray. We are making three balls today. They are set into the sand about one inch deep or more. Scissors will cut the tops off so the mix can be inserted easily. I made about a two inch diameter hole in each, cutting where the plug is to inflate the balls. This plug makes a depression into the finished product if not cut out at this point. It might be a good time here to mention that some of these instructions are variable and some are not. This is the way I do it after many many projects, and these tips are to help you have a more enjoyable time with the least amount of problems. Trust me, there is a reason for every step.
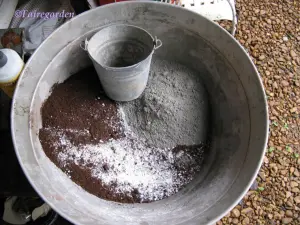
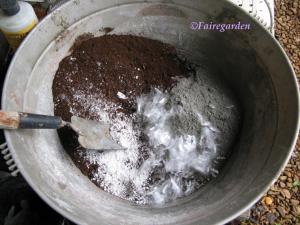
Allrighty then. Let's mix. A plastic tub from Big Lots is used for mixing. It is placed on a wooden bench next to the table to get some leverage for this task, for I am not strong. Having it lower lets you see that everything is combined well. A long handled garden trowel, also from Big Lots is the mixing tool. I used the small metal bucket to measure out the perlite, peat moss and cement in equal amounts. I filled the bucket nearly to the top with each. Then add a small handful of the fibermesh. If you cannot find this stuff, it can be omitted, but your project may crack and fall apart if left out in freezing temps. All of the projects we have done have been left outside in the elements for several years with no breakage. The mesh works magic. Mix the dry ingredients well, really well. Use your gloved hands to break up any lumps in the cement or moss. Spread the fibermesh into the smallest pieces possible, time consuming but worth the effort before you add the liquid.

Time to add the liquid. I use an equal amount of bonding agent and water, sort of, more water is added to make it the right consistency. I add about one half cup of bonding agent, an equal amount of water and begin stirring. It is better to add more water a little at a time until you get the consistency desired. Too wet is not good, but too dry will not work well either. Oatmeal has been mentioned as what you are looking for, but I like it a little drier than that since I make oatmeal a little runny. Make sure all the dry ingredients have been well wetted, like making a cake or brownies.

A large image is shown here because this is what your mix should look like. It should hold together in your gloved hand with a little pressure. The fibers can be seen mixed in nicely. The tub was moved over to the wall for better light to take the photo. It should be mentioned that trying to take pictures of this procedure without getting concrete or other stuff on the camera is quite difficult. Onward.

We sort of messed up here. At the same time as the balls were being made, we decided to try making a gourd too from an old dried gourd, strictly a prototype. There will be a seperate post on how to make a concrete gourd at a later date. The photo was taken of my hand putting the mix into the gourd rather than the ball, but it is the same procedure. Scoop a handful of mix, squeeze it a little to the shape shown and lower it into the ball. After several handfuls of mix were in, poke your finger inside to push the mix towards the bottom and remove any air pockets. For a larger project, use a stick. Keep adding the mixture until you get to the top. Push your finger down to get it well distributed and top off even with the ball.

After all three balls were filled, they were left to begin hardening. After a few hours I went back and covered the whole thing with the plastic edges used to line the tray. Now you need to wait about twenty four hours for the initial curing.

After the twenty-four hours has elasped, put on your gloves and feel the balls. If they feel hardened, you can now take the rubber off. Be very careful though, they can still break apart easily. You must use your most delicate touch. To lift the rubber from the concrete a nail was used. After the camera was put down the scissors were used to snip where the nail was holding the rubber away from project.


The rubber ball will tear away in a spiral down the rest of the way. On a couple of the balls, there was some concrete sticking out because the ball was overfilled. It can be cut away very carefully with a razor blade tool. It could also be left and be the bottom of the ball when it is placed in the garden. I cut away the excess and made a mental note not to overfill next time. I thought it might settle some, but it did not.

It is hard to measure exactly for each project and I have found it is better to have a little extra mix than not enough. Sometimes we make free form objects, like my avatar Mrs. Bongo Congo, but today we used a plastic tub for the leftover mix. The tub was lined with plastic wrap to make it easier to unmold. The idea was hatched to make several of these tub shapes, all the same height, to be used as stands for the balls or other things. Waste not want not we always say.

Here are the finished balls and tub, rolled in sand for no reason at all. They are in a plastic tent using an old mulch bag. Those bags that mulch come in are perfect for these concrete projects. Most things will fit easily inside and they are free if you ever buy mulch in bags. The hypertufa balls will need to cure for about a week before being placed out in the wild. This curing time will allow the concrete to set up and become very very strong. It is important that they are covered head to toe in plastic to allow the process of drying out to go slowly. It is the same as concrete sidewalks, the slower the drying, the stronger the product will be. If these were to hold plants, there would be another curing step to leach the lime out of them, but since these are strictly ornamental they can finish curing in the garden.
~~~

Above is the finished product, washed, cured and ready to be placed wherever a spot exists crying out for concrete balls. I hope this will inspire some to try making these for yourself. A cluster of them scattered in a nonchalant way adds a touch of whimsy and dare it be said, art to the landscape. Enjoy!
*Instead of the hypertufa mix, quikrete can also be used. The first photo shows a ball made using leftover quikrete from another project. Mix according to the directions on the bag and prepare the balls in the same way. This is a good lesson in working with the hypertufa though, good practice for making pots and troughs, learning how to mix and the amount of liquid to add comes with experience. These hypertufa balls are an easy way to get to know your hypertufa!
For other How To posts written by Fairegarden, look for How To on the sidebar page listing or click here.
Frances
How To Make Hypertufa Garden Spheres
Source: https://fairegarden.wordpress.com/2009/09/04/how-to-make-hypertufa-concrete-balls/
Posted by: wheelerrone1950.blogspot.com

0 Response to "How To Make Hypertufa Garden Spheres"
Post a Comment